認証をGoogleに全力で乗っかったAPIづくり
ゆるWeb勉強会@札幌 Advent Calendar 2020 15日目の記事です。
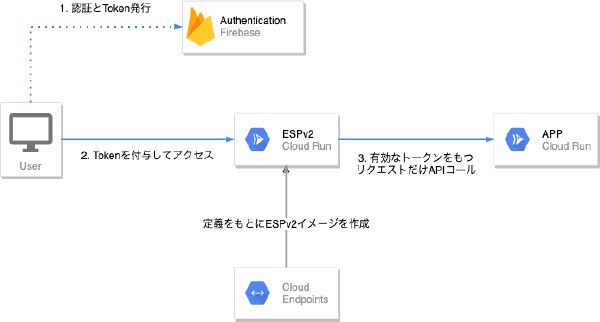
Firebase Authenticationで認証したユーザにだけ利用できるAPIをCloud Runに建てるという、
認証周りをGoogleに全力で乗っかったAPIを作ります。
何が良いのか?
認証周りをGoogleにすべて任せられる
ログインに使うID/PASSの管理やAPIへの認証後のアクセス制御をを全て丸投げできます。
そのため、自分たちはサービスの開発に集中することができます。
※ 認可については自分たちで作っていく必要あり。(アカウントごとにできることの制御とか)
(12/14にGoogleの認証系で大規模障害という奇跡が起きましたが、Googleは数時間で復旧するしきっと大丈夫)
ざっくりした流れ
- API本体をCloud Runへデプロイ
- Firebase Authenticationのセットアップ
- CloudEndpointのデプロイ
- ESPv2サービスをCloud Runへデプロイ

注意
Cloud Runには無料枠が設定されていますが、アクセス数に応じて従量課金となっています。
また、DockerImageをPushするContainer Registryも課金対象で、利用している容量に応じて課金されます。
(正確には、Imageを保存しているCloud Storageに対して課金されるため、バケット内のデータを削除)
学習目的で作成したあとは削除をお忘れなく。
※ 私もこの記事書き終わったあと、すべて削除しました。
前提
gcloudコマンドが実行できること
Cloud APIsが実行できるアカウント・プロジェクトが用意されていること
手順
※ {PROJECT_ID}など、固有情報は記載していませんので、適時置き換えてください。
APIを作成
シンプルなAPIを用意します。
index.js
const express = require('express')
const app = express()
const port = process.env.PORT || 3000;
const host = '0.0.0.0'

app.get('/', function (req, res) {
    res.json({ message: `ゆるWeb勉強会@札幌 Advent Calendar 2020`});
})

app.listen(port, host,  () => {
    console.log(`Example app listening at http://${host}:${port}`)
})
Dockerfile
FROM node:14.15.1-buster-slim

WORKDIR /app

COPY package.json /app
COPY yarn.lock /app

RUN yarn install

COPY index.js /app

EXPOSE 3000

CMD ["node", "index.js"]
Docker build して、GCPへPush
docker build -t gcr.io/{PROJECT_ID}/advent_calendar_2020_api .
docker push gcr.io/{PROJECT_ID}/advent_calendar_2020_api:latest
Cloud Runへデプロイ
インスタンス数が爆発すると怖いので、最大インスタンス数を1にしています。
gcloud run deploy advent-calendar-2020-api \
  --image="gcr.io/{PROJECT_ID}/advent_calendar_2020_api:latest" \
  --platform managed \
  --max-instances 1 \
  --concurrency 2 \
  --memory 128Mi \
  --project={PROJECT_ID}
作成されたCloud Runサービス
このAPIは認証が必要なClourRunサービスとしてデプロイされます。
そのため、APIリクエストしても401応答となります。

Firebase Authenticationのセットアップ
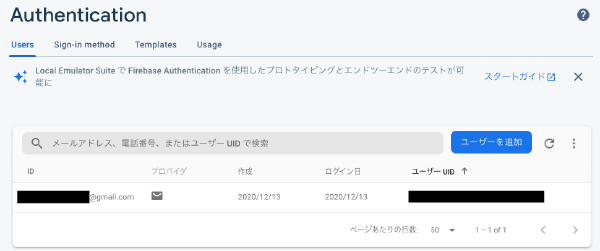
先程APIをデプロイしたGCP Projectに対して、Firebase側でもプロジェクトを作成して、Firebase Authenticationを有効化する。
(今回はメールアドレスとパスワードによる認証を利用しています)

テスト用のアカウントだけ追加しました。

Cloud Endpointをデプロイ
以下を参考に作成しています。
https://cloud.google.com/endpoints/docs/openapi/get-started-cloud-run#endpoints_configure
https://cloud.google.com/endpoints/docs/openapi/authenticating-users-firebase
openapi-run.yaml
swagger: '2.0'
info:
  title: Advent Calendar 2020
  description: Cloud Endpoint for Advent Calendar 2020 API
  version: 1.0.0
host: {APIのCloud Runホスト名}
schemes:
  - https
produces:
  - application/json
x-google-backend:
  address: https://{APIのCloud Runホスト名}/
  protocol: h2
securityDefinitions:
  firebase:
    authorizationUrl: ""
    flow: "implicit"
    type: "oauth2"
    x-google-issuer: "https://securetoken.google.com/{PROJECT_ID}"
    x-google-jwks_uri: "https://www.googleapis.com/service_accounts/v1/metadata/x509/[email protected]"
    x-google-audiences: "{PROJECT_ID}"
security:
  - firebase: []
paths:
  /:
    get:
      summary: Top API
      operationId: message
      responses:
        '200':
          description: A successful response
※APIエンドポイントを増やした場合、以下の定義に追加しないとリクエストしてもエラーになるため注意
gcloud endpoints services deploy openapi-run.yaml --project {PROJECT_ID}
エンドポイントにデプロイ成功すると以下のようなログが出力される。
Service Configuration [XXXXX] uploaded for service [{APIのCloud Runホスト名}]
この XXXXX はCONDIF_IDと呼ばれ、後続で利用するのでメモする
ESPv2イメージのビルドとデプロイ
gcloud_build_imageをダウンロードし、ビルドする
https://github.com/GoogleCloudPlatform/esp-v2/blob/master/docker/serverless/gcloud_build_image
参考:ESPv2とは
chmod +x gcloud_build_image

./gcloud_build_image -s {APIのCloud Runホスト名} -c {先程メモしたCONDIF_ID} -p {PROJECT_ID}
処理が完了すると、以下のESPv2イメージがGCPにPushされる
gcr.io/{PROJECT_ID}/endpoints-runtime-serverless:2.21.0-{APIのCloud Runホスト名}-{CONDIF_ID}
PushされたESPv2イメージで、Cloud Runにデプロイする。
参考:ESPのCORS対応
gcloud run deploy advent-calendar-2020-api-gateway \
  --image="gcr.io/{PROJECT_ID}/endpoints-runtime-serverless:2.21.0-{APIのCloud Runホスト名}-{CONDIF_ID}" \
  --set-env-vars=ESPv2_ARGS=--cors_preset=basic \ # CORSの対応
  --allow-unauthenticated \ # このCloud Runには認証不要でアクセスできるようにする
  --platform managed \
  --memory 128Mi \
  --max-instances 1 \
  --concurrency 2 \
  --project={PROJECT_ID}
作成されたCloud Runサービス

Firebase Authenticationで認証し、取得したTokenを使ってAPIコールしてみる
※ Nuxt.jsを利用しています。
  methods: {
    login() {
      firebase.auth().signInWithEmailAndPassword(this.email, this.password)
        .then((user) => {
          firebase.auth().currentUser.getIdToken(true).then((idToken) => {
            this.idToken = idToken
          })
        })
    },
    callAPI() {
      this.$axios.get('https://{ESPv2イメージでデプロイしたCloud Runホスト名}/', {
        headers: {
          Authorization: `Bearer ${this.idToken}`,
        }
      }).then(res => {
        this.message = JSON.stringify(res.data)
      }).catch(error => {
        this.message = JSON.stringify(error.response.data)
      })
    }
  },
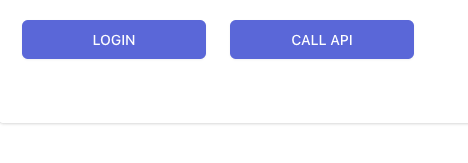
実際にAPIコールした様子
初期表示

Firebase Authenticationで取得したトークンをHeaderに埋め込んでAPIコール
LOGINボタンクリック後、CALL APIボタンをクリック

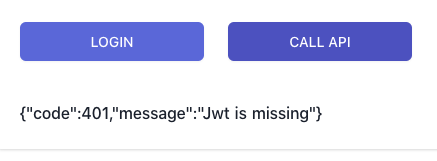
認証せずにAPIコールした場合
LOGINボタンクリックせずに、CALL APIボタンをクリック
